
Provisioning a VM for Pi-hole using Vagrant
Testing out Pi-hole, Hold the Pi
I had come across Pi-hole a while ago and was recently inspired by someone on Twitter to test it out. Unfortunately I didn’t have a Raspberry Pi on hand, having just used my Pi in a Christmas present. My solution was to spin up a virtual machine (VM) on my desktop and test it out. Since VirtualBox can’t emulate ARM processors we can’t actually use Raspbian, so I used Ubuntu. The test went well and I soon had a virtualized Pi-hole blocking ads on my network (including on my phone)!
When I was done for the night I shutdown the virtual machine and was sad to see ads again, particularly on my phone. I came close to ordering another Raspberry Pi, however decided to go ahead with a more permanent solution involving some sort of containerization or virtualization on my home server. The server isn’t much, just an Intel Pentium G3220 Haswell with 4 GB of RAM. The limited resources made me initially think docker would be ideal, rather than leaving a VM running on the dual-core machine all the time.
I don’t know much about docker, but since it was still holiday break I thought it would be good to finally learn something about it. I ran through the get started tutorial in the docker documentation, which was actually really neat, I recommend you check it out if you’re at all interested. However, I ended up realizing that having a web server already running on this machine, and Pi-hole requiring use of port 80, complicates things beyond what I wanted to deal with. I had attended a talk about Vagrant last year, and thought I might make use of that experience. For those who aren’t familiar with Vagrant, it is a program which allows you to build and manage VMs, with the ability to interface with many different services, though for this we’ll be using VirtualBox.
So we’ll be walking through steps to setup vagrant on your computer, provision a VM for use with Pi-hole, and the initial Pi-hole setup. You can run this on any computer, though for any sort of long term use, you’ll likely want to set this up on something stationary and always on (which I suppose is why a Raspberry Pi makes such a great target device.)
Vagrant
We’ll need two things, vagrant, and virtualbox, which acts as a provider for vagrant. My server runs Arch Linux, to install these we’ll just run:
sudo pacman -S vagrant virtualbox virtualbox-host-modules-archIf you’re on a different system I’ll leave the installation to you.
Quick Intro
Vagrant has a very fast and easy to follow Getting Started Guide. The pages are short and they go by quick. If you want to get familiar with vagrant quickly, I’d recommend going through that. We’ll do enough to get the VM up and running, but won’t cover everything in their guide.
Vagrant uses what they call a VagrantFile to configure a VM (usually referred
to as a box.) Perhaps the simplest VagrantFile defines only the VM
box. For example,
Vagrant.configure("2") do |config|
  config.vm.box = "ubuntu/xenial64"
end
This tells vagrant that we want to use the “ubuntu/xenial64” box from their publicly hosted catalog of boxes. Anyone can upload these boxes, so the usual caveats about being careful with what you trust come along with it. That said, it appears the ubuntu account looks to be official.
If you’d like to try this out, create a new directory and put the short
configuration above into a file called VagrantFile. Once you’ve made your
VagrantFile all that’s needed is to run:
vagrant upThis will pull the xenial64 box and start it up. You can open VirtualBox and watch this happen. You can then connect to the new machine with:
vagrant sshYou should be at a prompt within the VM now. Neat, right?
Provisioning the Pi-hole VM
We’ll make just a few changes to that basic VagrantFile.
1
2
3
4
5
6
7
8
9
10
11
12
13
14
15
# -*- mode: ruby -*-
# vi: set ft=ruby :

Vagrant.configure("2") do |config|
  config.vm.box = "ubuntu/xenial64"
  config.vm.hostname = "pihole"
  config.vm.provider "virtualbox" do |vb|
    vb.name = "pihole"
    vb.customize ["modifyvm", :id, "--cpus", "1"]
    vb.customize ["modifyvm", :id, "--memory", "1024"]
    vb.customize ["modifyvm", :id, "--usb", "off"]
    vb.customize ["modifyvm", :id, "--usbehci", "off"]
  end
  config.vm.network "public_network", ip: "192.168.1.100"
end
Let’s walk through this and see what’s going on, starting with lines 1 and 2:
# -*- mode: ruby -*-
# vi: set ft=ruby :
These are modelines, telling emacs and vi that we’re looking at ruby, which is what the VagrantFiles are in. These aren’t required, but they’re common to see.
Line 4, the Vagrant.configure("2") line, tells Vagrant which configuration
version we’re using.
Don’t change this. We already know config.vm.box specifies the box we want to
pull. config.vm.hostname sets the hostname we’ll use on the VM to “pihole”.
config.vm.provider sets the provider to be “virtualbox”, which is is by
default, but this allows us to specify some more options (which we’ll run
through in a minute. Finally, config.vm.network specifies the network to be a
“public_network”, which for VirtualBox makes it a “Bridged Adapter”, this
allows us to assign the VM an IP as if it is directly connected to our local
network. We then set this IP on the rest of the line to be 192.168.1.100. Set
this to whatever you want, ideally outside of your router’s DHCP address range.
Let’s look now at the options set in config.vm.provider, lines 7-13.
  config.vm.provider "virtualbox" do |vb|
    vb.name = "pihole"
    vb.customize ["modifyvm", :id, "--cpus", "1"]
    vb.customize ["modifyvm", :id, "--memory", "1024"]
    vb.customize ["modifyvm", :id, "--usb", "off"]
    vb.customize ["modifyvm", :id, "--usbehci", "off"]
  end
This does the resource limiting for the VM, limiting the box to use of 1 CPU,
and 1024 MB of RAM. (Note with this few resources, it could take a little while
to boot, be patient. Vagrant defaults to a 5 minute timeout, if it doesn’t boot
by then it’ll throw a warning. If you can, you can try increasing the resources
available, or increase the default timeout with config.vm.boot_timeout
provided in seconds.) The usb options explicitly disable USB passthrough. I do
this simply to ensure any USB device I plug into the server doesn’t show up on
the VM too.
Then to provision the box we just need to run vagrant up.
A successful vagrant up will produce output similar to this:
[koopman@honey pihole]$ vagrant up
Bringing machine 'default' up with 'virtualbox' provider...
==> default: Importing base box 'ubuntu/xenial64'...
==> default: Matching MAC address for NAT networking...
==> default: Checking if box 'ubuntu/xenial64' is up to date...
==> default: Setting the name of the VM: pihole
==> default: Clearing any previously set network interfaces...
==> default: Preparing network interfaces based on configuration...
    default: Adapter 1: nat
    default: Adapter 2: bridged
==> default: Forwarding ports...
    default: 22 (guest) => 2222 (host) (adapter 1)
==> default: Running 'pre-boot' VM customizations...
==> default: Booting VM...
==> default: Waiting for machine to boot. This may take a few minutes...
    default: SSH address: 127.0.0.1:2222
    default: SSH username: ubuntu
    default: SSH auth method: password
    default: Warning: Connection reset. Retrying...
    default: Warning: Remote connection disconnect. Retrying...
    default: Warning: Connection reset. Retrying...
    default: Warning: Remote connection disconnect. Retrying...
    default: Warning: Connection reset. Retrying...
    default: Warning: Remote connection disconnect. Retrying...
    default: Warning: Connection reset. Retrying...
    default: Warning: Remote connection disconnect. Retrying...
    default: Warning: Connection reset. Retrying...
    default: Warning: Remote connection disconnect. Retrying...
    default: Warning: Connection reset. Retrying...
    default: Warning: Remote connection disconnect. Retrying...
    default: Warning: Connection reset. Retrying...
    default: Warning: Remote connection disconnect. Retrying...
    default: Warning: Connection reset. Retrying...
    default: Warning: Remote connection disconnect. Retrying...
    default:
    default: Inserting generated public key within guest...
    default: Removing insecure key from the guest if it's present...
    default: Key inserted! Disconnecting and reconnecting using new SSH key...
==> default: Machine booted and ready!
==> default: Checking for guest additions in VM...
    default: The guest additions on this VM do not match the installed version of
    default: VirtualBox! In most cases this is fine, but in rare cases it can
    default: prevent things such as shared folders from working properly. If you see
    default: shared folder errors, please make sure the guest additions within the
    default: virtual machine match the version of VirtualBox you have installed on
    default: your host and reload your VM.
    default:
    default: Guest Additions Version: 5.0.40
    default: VirtualBox Version: 5.2
==> default: Setting hostname...
==> default: Configuring and enabling network interfaces...
==> default: Mounting shared folders...
    default: /vagrant => /home/koopman/vagrant/pihole
If this is your first time running vagrant up it’ll also spend time
downloading the box image. Note the Connection reset and Remote connection
disconnect warnings are just us trying to ssh before the ssh service has come
online. You can now connect to the VM with vagrant ssh.
Installing Pi-hole
Now we just need to install Pi-hole. For this I refer to their github
page. They
provide a simple one-liner which pipes to bash, not ideal. During my first
installation I followed “Alternative Method 2” and checked out the script I was
running. If you’re trusting enough, use the one-liner. We have to check one
thing before moving forward though, our static IP interface, to do so run
ifconfig, and note which interface is associated with your assigned static IP
(in this example 192.168.1.100), for instance enp0s8. Once you have noted
that, run installer.
I won’t cover most of the dialogues, they’re pretty straight forward. You’ll want to select the interface we noted above at the “Chose An Interface” option. (If you forgot to note which interface, I can almost guarantee it’ll be the second option, since vagrant sets up two network interfaces, the first for its own use, the other for the public network.
Pi-hole needs to know where to point its upstream DNS queries, since it acts as a middle man. Use whatever you feel like here, Google is a safe bet. I decided to try out Quad9. This is also configurable from the Pihole interface so don’t spend too much time thinking here.
The potentially tricky part is the network configuration, you’ll reach a screen that looks like this:

We don’t want to use this, as it is for the first network interface, not our public network bridged adapter, so select “No”. Then we’ll enter our assigned IP from the VagrantFile like so:

This is followed by specifying our gateway, which is likely your router,
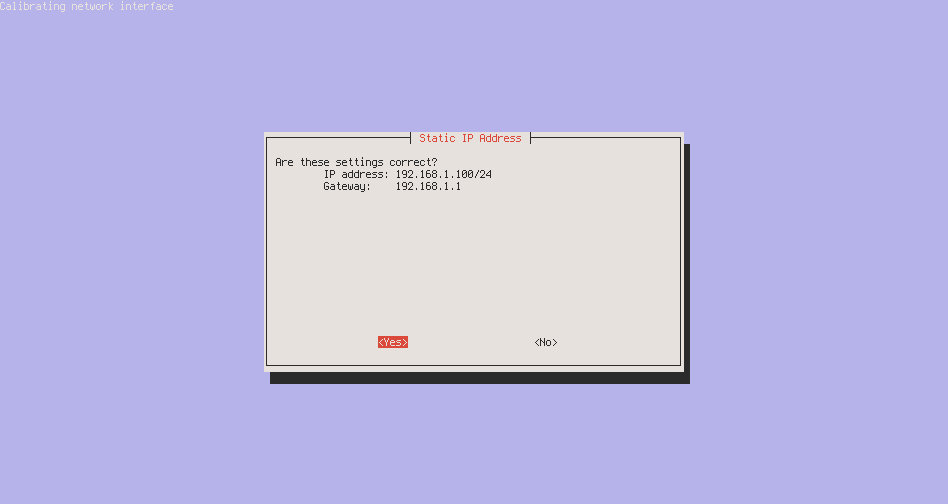
commonly (and in my case) 192.168.1.1, so enter that here:

You’ll then be asked to verify the settings, it should look something like this:
The last two prompts are about the admin interface, which is neat, you should install it.
If everything goes smoothly you’ll land on an “Installation Complete!” page like this:
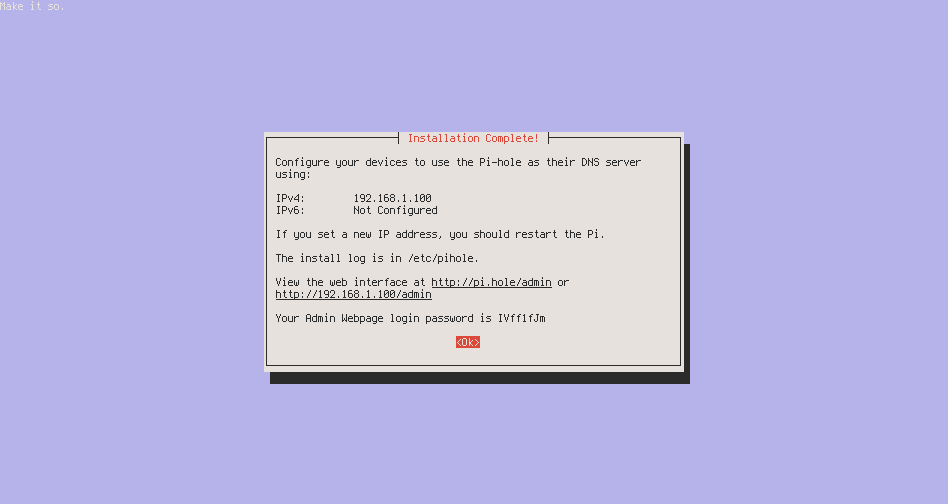
You should note down the Admin login info, as it can’t be retrieved after this.
(Note if you need to redo this for whatever reason, just run the installer
again and select reconfigure. In more dire circumstances we can remove the VM
and reprovision with vagrant destroy and another vagrant up.)
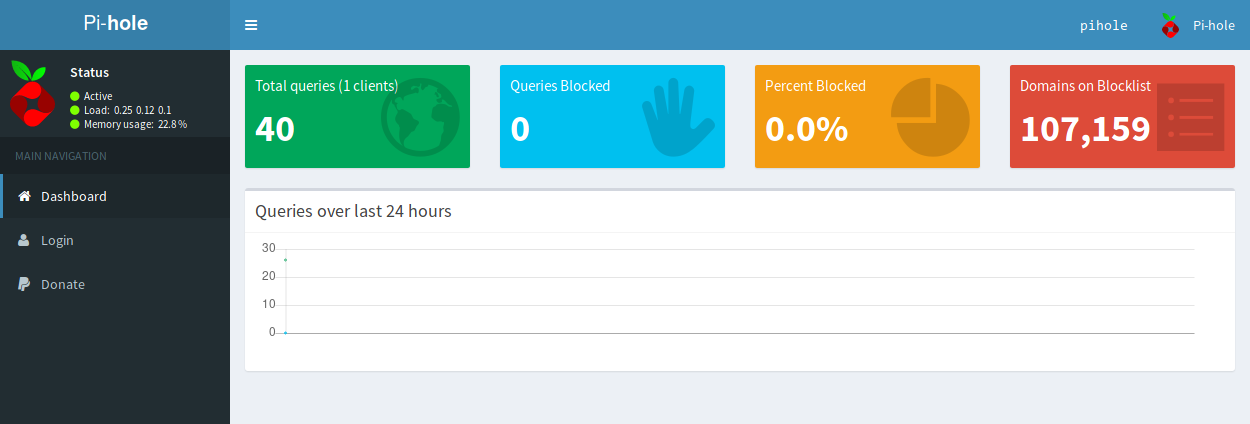
Now we can point our browser to 192.168.1.100/admin, you should see the
pi-hole dashboard:
Configure Your Devices
You have several options for configuring your devices to use your new VM as a DNS provider. They are well enumerated on the Pi-hole discourse.
I would prefer to go with option 1, configuring the Pi-hole as my router’s only DNS provider, however I don’t want this experiment to negatively affect my housemates, so I went with option 3, configuring each device individually. This allows me to use the Pi-hole and doesn’t force it upon my housemates. I have several devices with different configurations, so I’ll go over configuring each of them.
Android
To start, my phone, perhaps the primary motivation for setting this up, since Google has been forcing links to open in Chrome, which lacks ad block on mobile. I use an Android phone, which at the time of this write up is running version 8.0.0.
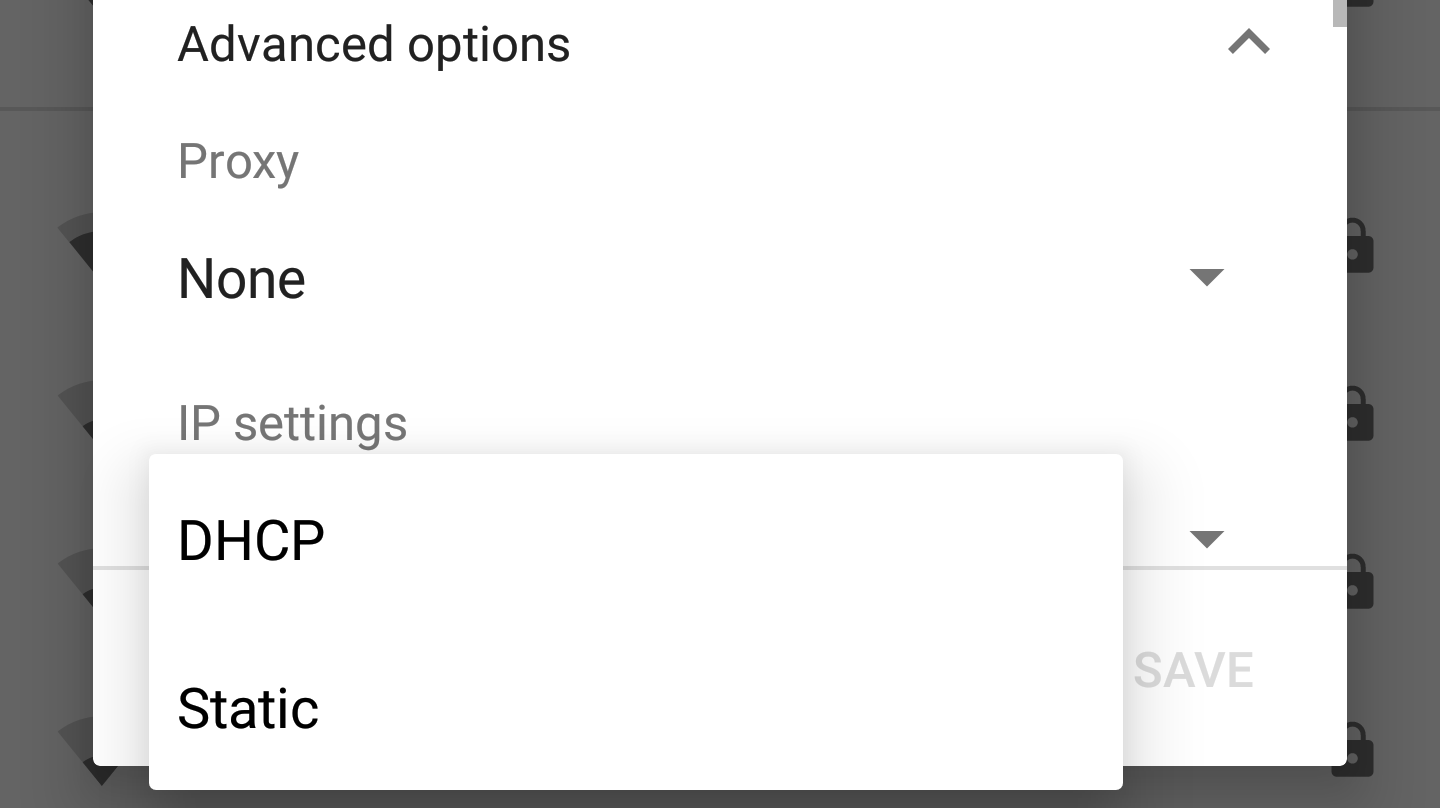
To setup the pi-hole as your Android phone’s DNS provider navigate to the Wi-Fi settings and click and hold on your home network, this should pop up a menu as shown here:
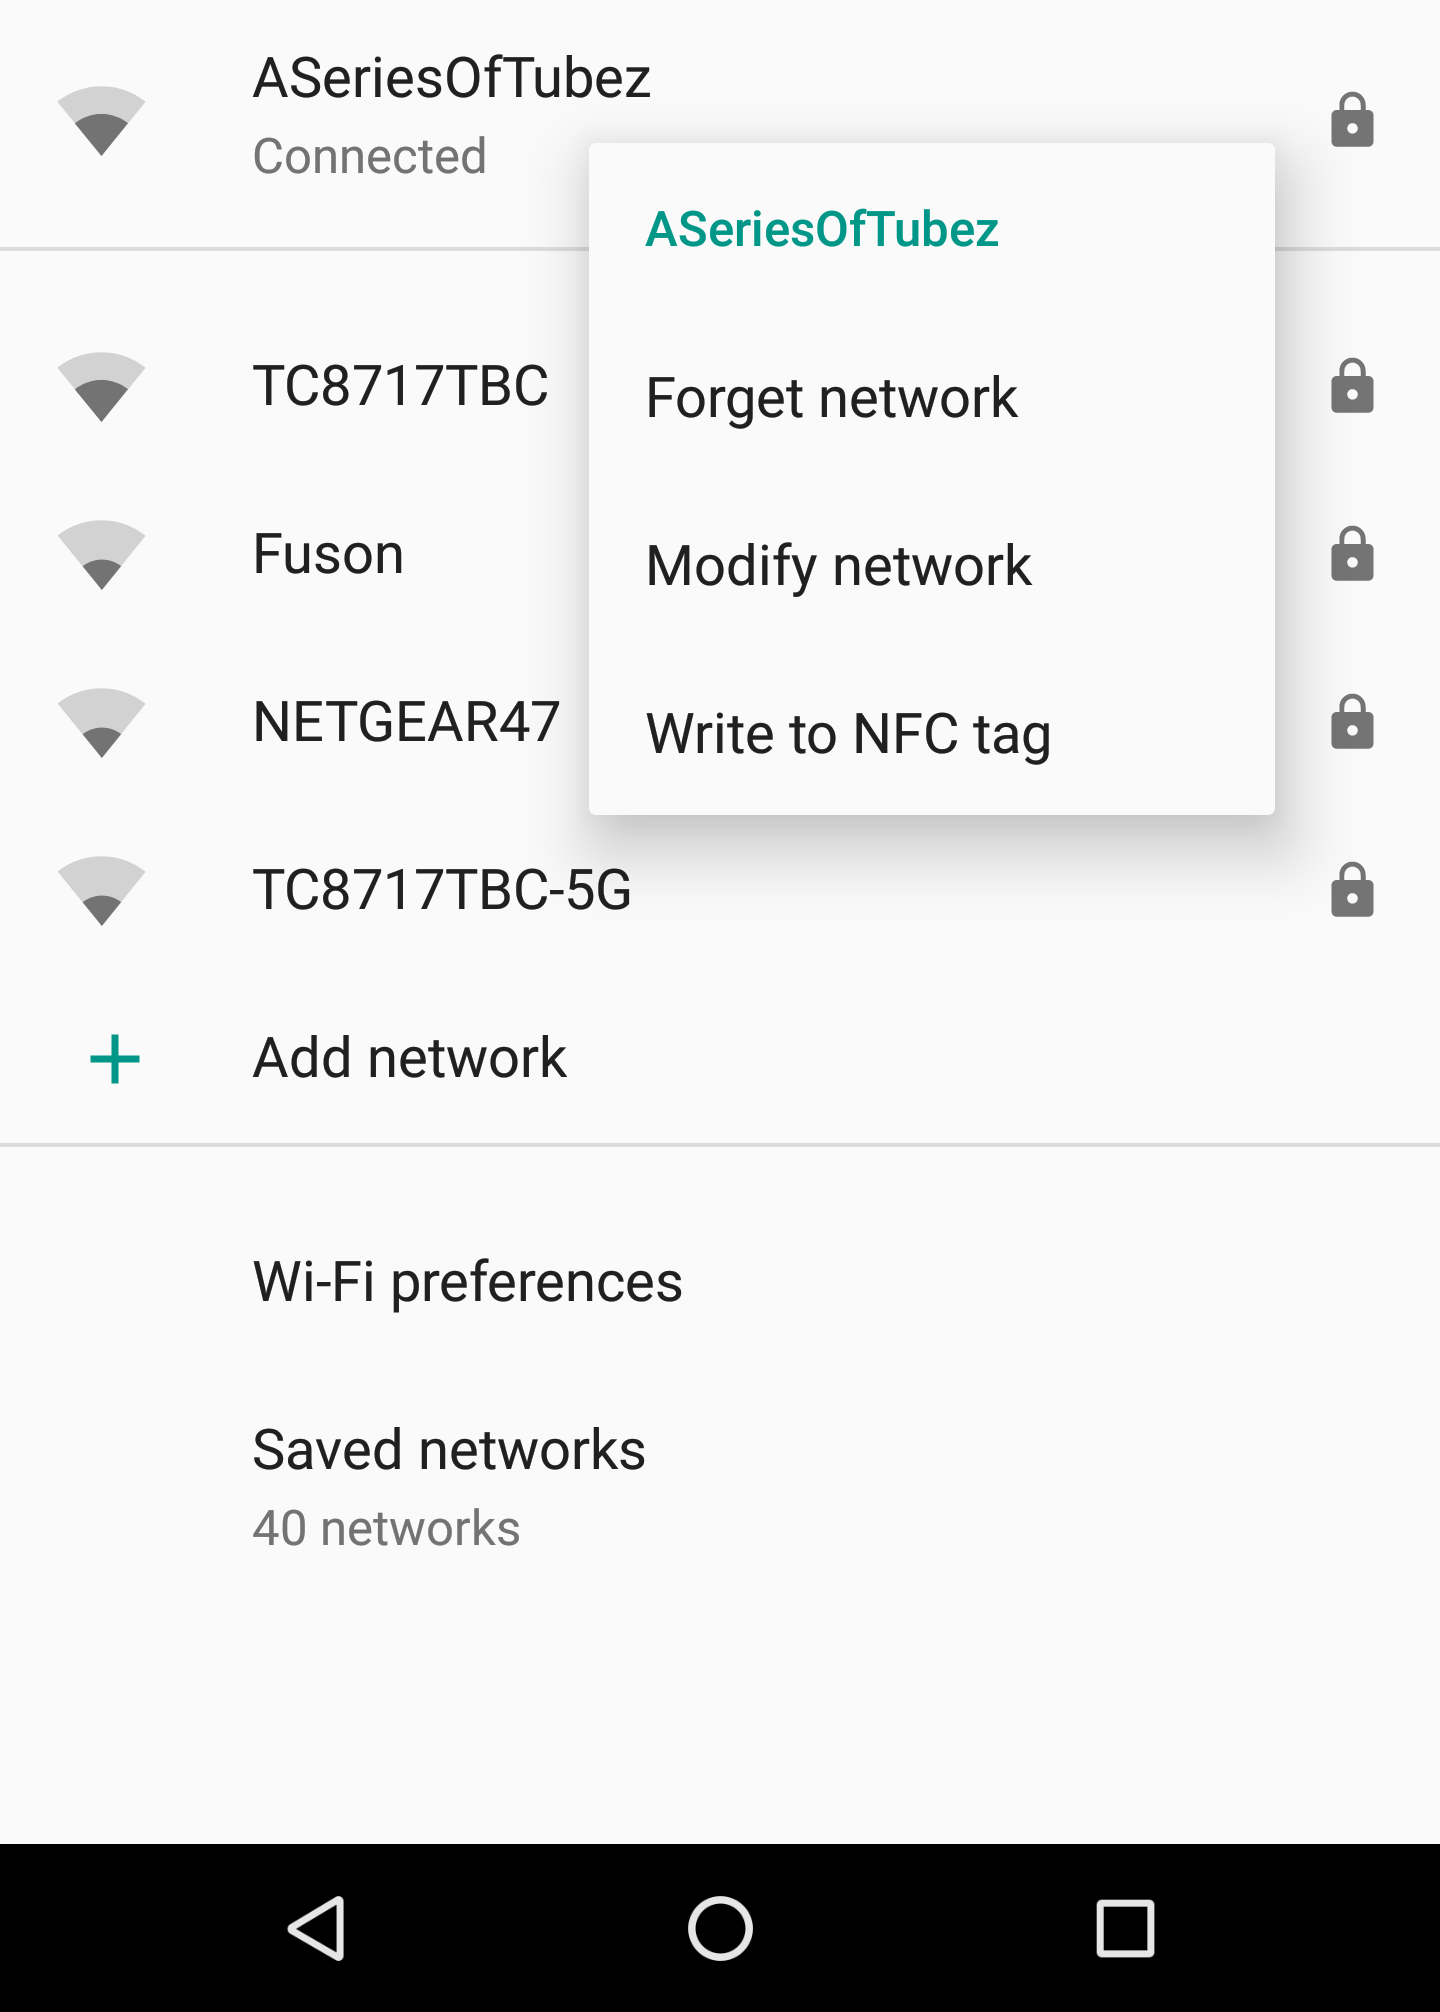
Click on “Modify network”. Scroll down to “IP settings”, where we want to select “Static”. Unless you’ve configured this previously it is likely on “DHCP”.
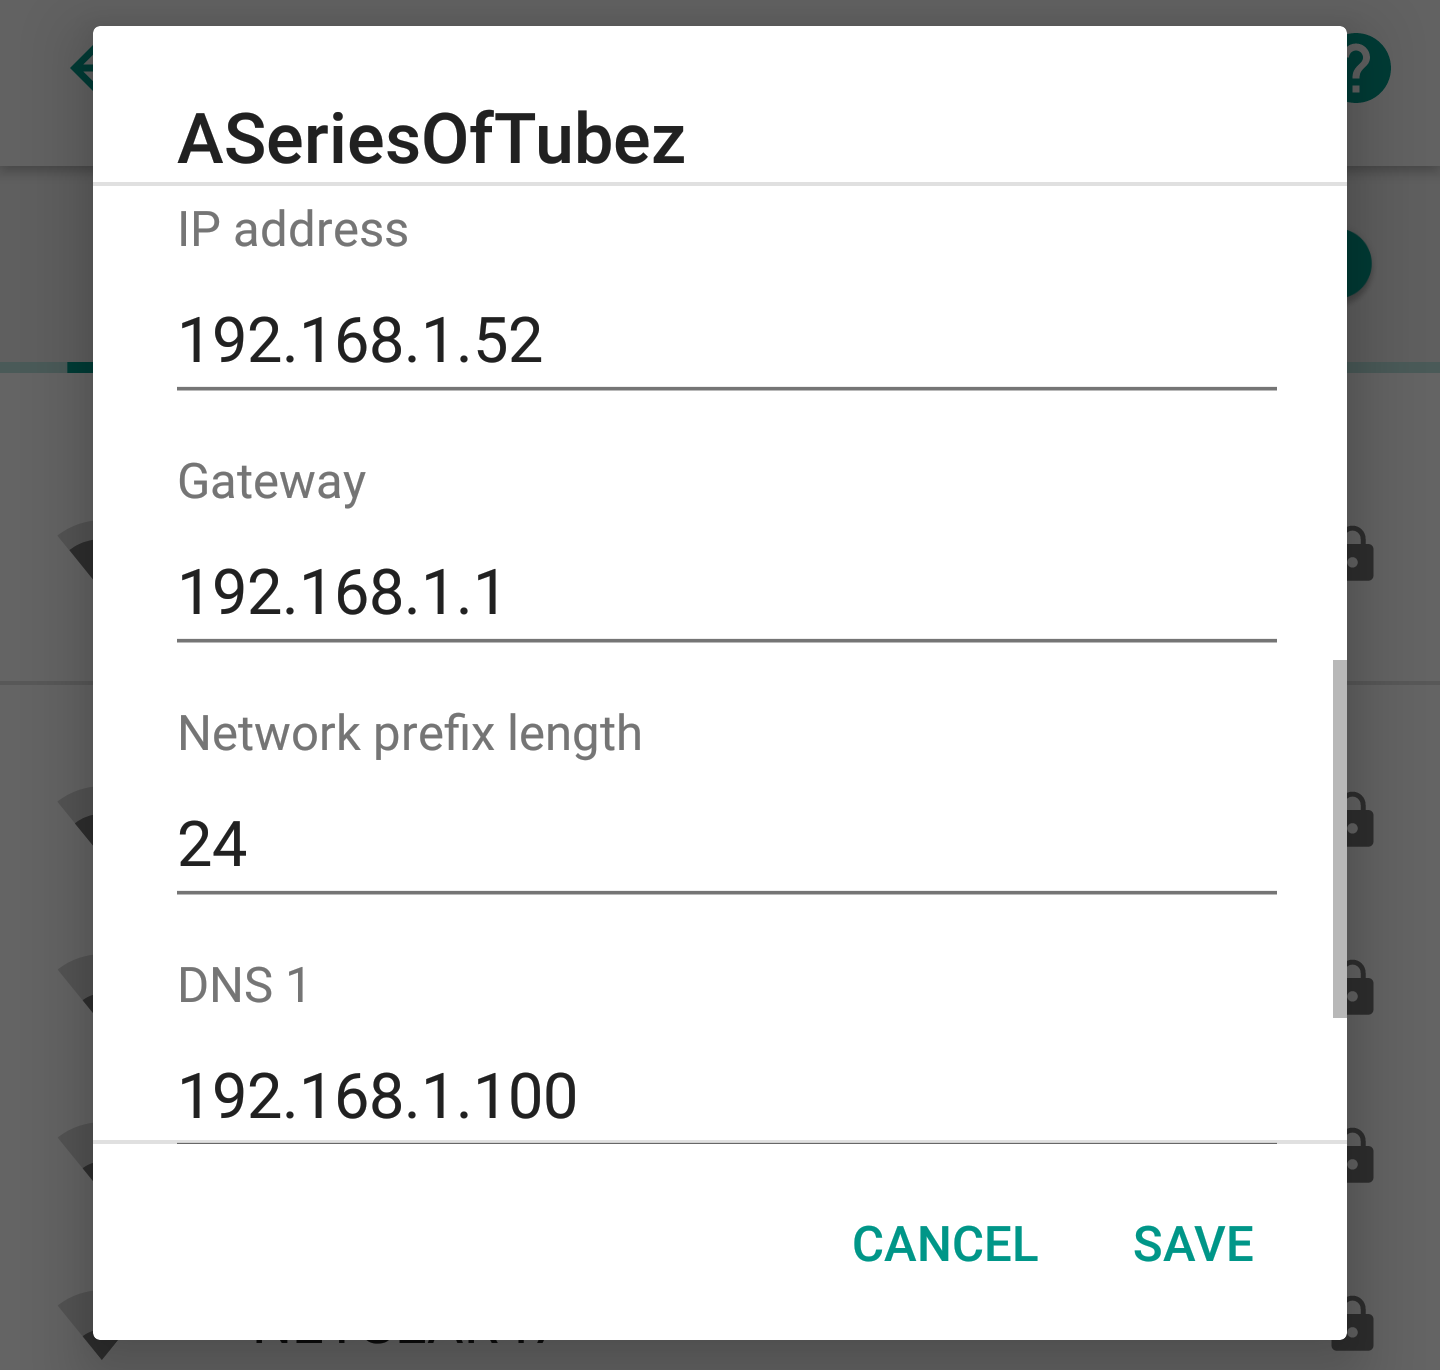
This will allow for input of a static IP address for your phone, along with all
the other necessary details, including of course the DNS provider. Here we’ll
enter the IP of our Pi-hole, 192.168.1.100 as shown here:
I find I then have to toggle Wi-Fi off and on again in order to fully reconnect, else it might look like you’re connected, but you won’t actually have Internet access.
Linux
I am running Arch Linux on my desktop and laptop. On the desktop I am using dhcpcd and on the laptop NetworkManager (with nm-applet). Their configuration differs slightly.
dhcpcd
I should have setup a static IP long ago for the desktop, to do so, add these
details to your /etc/dhcpcd.conf file:
interface eth0
static ip_address=192.168.1.64/24
static routers=192.168.1.1
static domain_name_servers=192.168.1.100
Be sure to use an available IP address, and again one outside of your router’s DHCP range.
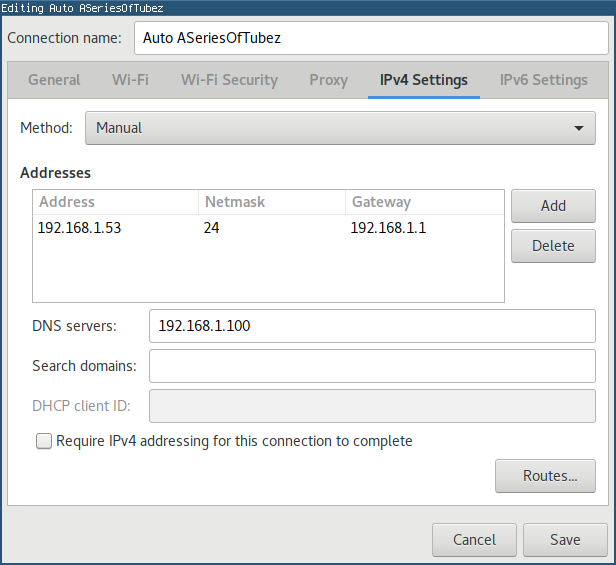
nm-applet
nm-applet is similarly easy to configure, just open up the the connection
editor, navigate over the IPv4 Settings and enter the following, substituting
in a suitable IP address:
Wrapping Up
That’s it! We’ve created a Pi-hole instance on a virtualized Ubuntu box using vagrant and configured our devices to use it as a DNS provider. You can use the Pi-hole dashboard to view how many blocked DNS requests you make on which devices.
If you ever want to undo all this though, perhaps so you can move to a
Raspberry Pi, you will have to revert the individual devices’ network
configurations. You can then bring down the VM by navigating to the same
directory where your VagrantFile lives and run vagrant destroy. It’ll
prompt you to make sure you want to actually do it, but then the VM will be
gone.